
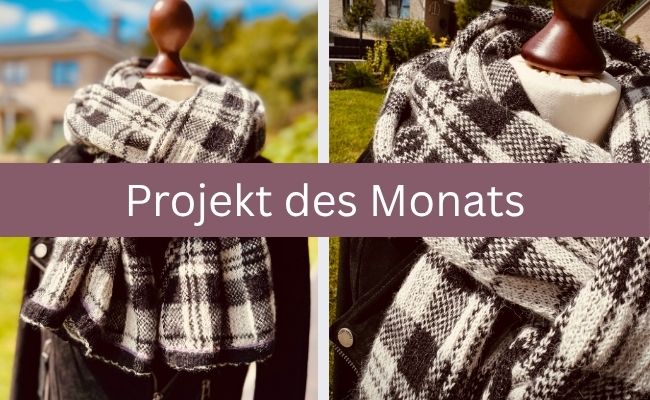
Fair Isle knitting
Fair Isle. Two words that make some eyes light up and others experience sheer horror.
Yet Fair Isle knitting is actually much more relaxed than its reputation suggests. Two strands, a little practice, and suddenly patterns emerge that make other people ask if you really made that yourself. (Yes! Yes, you did. Accept the compliment.)
In this post, you'll get everything you need to get started with Fair Isle knitting:
- choosing the right yarn
- the right color combination
- the principle of color dominance
- the steeking technique for cutting open projects knitted in the round
- including a video workshop with homework to knit along with.
Which yarn is suitable for Fair Isle knitting?
For Fair Isle knitting, pure virgin wool in a medium to thin weight, tightly twisted and with a smooth surface, is best. Here is why exactly this combination makes the difference:
- The fibers: Virgin wool is naturally elastic and "grips" itself easily. That sounds chaotic at first, but it helps you enormously in keeping the floats on the back even. Cotton or silk work too, but require a bit more patience and a watchful eye.
- The weight: Medium to thin yarns, such as sock yarn, sport, or DK weight, are the clear favorites here. They show fine patterns much more clearly than a thick yarn ever could, with which everything quickly looks a bit washed out.
- The twist: Sounds technical, but is simple: Tightly twisted yarn keeps the stitches defined and makes your pattern look crisp.
- The surface: Smooth, even yarns make your pattern appear clear. Fluffy or hairy yarns, on the other hand, swallow every detail.
How do you choose colors that harmonize in Fair Isle knitting?
Colors in Fair Isle knitting harmonize best when they differ significantly in brightness or saturation. Contrast is more important here than "favorite colors that might somehow go together."
A few strategies that really help:
 Use contrasts. For a pattern to really stand out, you need differences in brightness or saturation. Two colors that are too similar just blur into one another – the pattern may be technically there, but it won't be visible.
A little color theory helps. Complementary colors, i.e., those that lie opposite each other on the color wheel (blue and orange, for example), create a really strong contrast. Analogous colors that lie next to each other, like blue and green, appear softer and more harmonious. Both have their charm; you just need to know which look you want.
Tone-on-tone works too. If you prefer it subtle, combine different shades of the same color family. However, it is still important: even here, you need light and dark tones, otherwise the pattern will disappear into itself.
You can find inspiration everywhere. An autumn forest, a sunset, a favorite painting, a fabric pattern that has been swirling around in your head for weeks... use it as a starting point for your color palette.
And then: swatching. I know, no one likes it. But a yarn in a skein often looks completely different than in the finished pattern. A small swatch saves you from a nasty surprise at row 40.
What is color dominance in Fair Isle knitting?
Color dominance determines which of the two colors in a Fair Isle pattern stands out more. It is controlled solely by the tension of the yarn, not by the color itself. This is the point where many stumble when two-color knitting, and honestly: rightly so, because it sounds more complicated than it is.
You consistently hold the color you want to appear more dominant underneath the other. The yarn lies closer to the needle when it is not being knitted.
In practice, this means: If you hold both yarns in your left hand, the dominant color is on the left, the second on the right. The left yarn travels a slightly longer distance on the back and therefore stands out more prominently on the front.
The one rule that really counts: Consistency. Once you have decided which color dominates, you must absolutely stick with it throughout the entire project. Switch mid-way, and your pattern will suddenly look restless without you being able to say exactly why.
What is steeking and what is it used for?
Steeking refers to the cutting of a project knitted in the round along additional, previously planned stitches. This allows you to create openings for vests and cardigans without having to knit back and forth in rows. "Steek" sounds like a mixture of a piece of Swedish furniture and a threat, but it is actually one of the most practical techniques in Fair Isle knitting.
A steek is a narrow area of extra stitches that you consciously plan to cut open later. The trick: You knit your project completely in the round, which is much easier with multi-colored patterns because you only have to deal with knit stitches and don't have to juggle floats on the back. Only then do you cut where an opening should be.
For the steek itself, 5 to 7 extra stitches are usually sufficient, which you plan during the initial cast-on. And before you panic: Before cutting, you must secure it. Three methods have proven successful:
- With a sewing machine: two parallel zigzag stitches to the left and right of the intended cutting line (my favorite method)
- By hand: a backstitch along the cutting line
- Crocheted: a single crochet edge along the steek stitches
All three basically do the same thing... they hold the stitches in place so that nothing frays when cutting. And yes, the first cut just feels terrible.
Learning Fair Isle knitting: Your video workshop
Enough theory, it's time to get hands-on. In my YouTube series "Fair Isle Knitting," I accompany you step by step through exactly the points we just discussed. And because dry theory is useless without practice, there is a small piece of homework for your collection binder with every video.
Video 1: The technique of Fair Isle knitting – First steps
Here we get straight to knitting. I show you step by step how to knit the first stitches easily and which technique I use to hold the yarns.
Video 2: Weaving in yarns
You will learn how the floats on the back are woven in. This is the difference between a knitted piece that remains elastic and fits neatly – and one where a finger suddenly gets caught in a yarn loop when putting it on. As a rule of thumb: You should weave in after about 5 stitches without a color change so that no floats that are too long are created.
Video 3: Concealing round transitions
A short but important detail: Especially with round projects like hats, socks, or sleeves, visible round transitions can disrupt the look. I'll show you a simple trick to make your patterns transition seamlessly into one another.
Video 4: Purling
I try to avoid purling as much as possible and only do it for sock cuffs or similar; otherwise, everything for me is done in knit stitches, which simply benefits the knitting flow and the pattern look. Nevertheless, the purl stitch belongs in your repertoire, and in Fair Isle knitting, it is particularly important that it sits evenly and neatly.
Video 5: Securing and cutting a steek
Now it's time to get down to business. We talk about securing and cutting open your knitting projects, also known as "steeking."
There are 3 methods:
- Sewing with a sewing machine
- crocheting single stitches
- Hand stitching
I will show you step by step how to safely prepare your knitted piece so that nothing goes wrong when cutting.
Watch the videos, try out the tips, and above all, have fun knitting. I'm already looking forward to seeing your progress in my Facebook group.


Leave a comment
This site is protected by hCaptcha and the hCaptcha Privacy Policy and Terms of Service apply.